I knew what I was up against. A tent. They're fun, and I'm all about letting these little people have some of it. Really. I just prefer tent fun to be had outside. People trip over them in the middle of the night and it's no fun landing on dolls and combs and laptops and dishes when you're least expecting it. Seriously. They pack them full, and shortly after, abandon ship...never to return.
So we came up with the idea to make a tent out of her bed. We shopped online for canopies at Lands End and Pottery Barn and Restoration. I'd put them in my cart and could never commit. It just seemed so expensive, even with the holiday sales. And I'm picky, let's face it. There was always something "off" about each one of them. So as usual, I came up with the bright idea that we'd make our own. That was months ago. And this poor girl of mine has kept asking and asking and asking. So yesterday I took the day off while my little gal was home sick. Which basically means I worked on something around here that I don't get paid for. At least not in cash. And sometimes those are the best projects. The ones I do on a whim and get paid in HUGS for. :)
Project: Princess Canopy
SUPPLIES:
3 rods or sticks for a sloped ceiling, or 2 for a flat ceiling
6 ceiling hooks, or 4 for a flat ceiling
burlap string
curtains, sheets or fabric (I used 4 120" long curtains and 1 king size bed sheet)
string lights


STEP 1
You'll need 3 rods a little longer than the width of your bed. (Or two if you're ceiling is flat...see blue sketch above). One for the middle, and two for each end. You could buy a curtain rod or a wooden rod and cut them down.
Or if you're cheap like me, gather STICKS. Long straight ones are best if you're using a ringed curtain for the canopy. If you're just draping fabric over the stick, straightness doesn't matter so much. Either way, find some that can hold some weight. Then use your foot as a brace and grab one end and puuuull, breaking them to the length you want. It's not perfect, but it works, let me tell ya. Especially if you're going for the "natural" look...lol.

STEP TWO
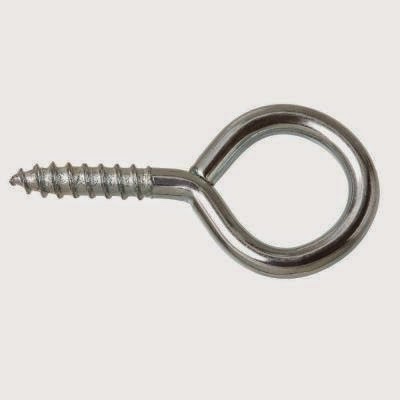
Find some hardware. I used these little hooks and twisted them into the drywall ceiling right above where the rod/sticks will hang. I used two per stick, one on each end of the stick.

STEP THREE
Then I found some burlap string or twine I had lying around and strung it thru each ceiling hook and tied a fancy knot.

STEP FOUR
Weave the center stick (preferably the straightest one) thru the curtain rings. I used four sheer curtains and hung two at a time, alternating rings from one curtain to the other. This helped the curtains looked woven together at the top rod. I even drew you a little sketch to explain.


STEP FIVE
Stick the rods/sticks thru the knotted string holes.


STEP SIX
Drape your fabric from the center stick out to the end sticks.

STEP SEVEN
Stop and get some hugs from your happy tent lover.

STEP EIGHT
Grab a sheet or two and hang them on the front. I actually used an old king size sheet I had and cut it in half. Then cut small holes in the sheet and tie them with the burlap string to each rod/stick. I ended up folding the corners of the sheet back over the canopy since our ceiling is sloped. If you were working with a flat ceiling you wouldn't have to do that.

STEP NINE
String up some lights if you're feeling crazy!


